



Optimising LoRaWAN Coverage: Best practices and Radio Planning
In summary:
- Poor coverage on your LoRaWAN network drives CAPEX (Capital Expenditure) and OPEX (Operational Expenditure) costs that were never budgeted for in the first place: several thousand euros for every gateway added after deployment.
- Some installation best practices help prevent many of the coverage gaps observed in the field: installation height, cabling losses, radio interference, and more.
- A radio planning study tells you exactly how many gateways your project needs and pinpoints the installation sites to prioritize.
You may have already experienced this (and if not, it’s worth avoiding). For your LoRaWAN network project, you rely on a coverage map indicating that 3 gateways will be enough to cover your entire deployment area. But once the sensors are installed and tested, you find that some areas aren’t covered. So you add 2 gateways, then 2 more. The problem: none of these additional installations were accounted for in your plan or your budget.
This is exactly what we explored with our partner Siradel during our webinar, “LoRaWAN Coverage Optimisation: Cut TCO with Radio Planning.” This article covers the essentials, combined with Kerlink’s field experience: how a handful of installation best practices, and a radio planning study for larger-scale projects, can help you anticipate coverage gaps instead of dealing with them after the network is already deployed.
How much does installing a gateway really cost?
On its own, the equipment cost is minimal: a gateway and its antenna account for less than 10% of your TCO (Total Cost of Ownership) over 5 years.
Installation costs, on the other hand, can significantly impact your CAPEX. They typically include the site pre-visit and survey, labor, and equipment rental to access the site (a cherry-picker, for example), among other things.
Depending on the site, these costs range from €3,000 to €8,000. In other words: that’s what every gateway added after the fact costs you, on top of those already planned in the initial budget, just to reach adequate coverage.[1]
Insufficient coverage also drives up operating costs (OPEX). The root cause is often the same: messages sent by sensors never reach the gateway or arrive incomplete. This is measured by the PDR (Packet Delivery Ratio), which drops as soon as radio coverage is insufficient. In practice, this results in:
- repeated site visits: a single intervention can cost up to €1,000, and a failed first visit requires an average of 2.7 visits in total to resolve the issue;
- a risk of breaching your SLA (Service Level Agreement): missing data, penalties, and a loss of trust that never shows up on an invoice.
[1] Kerlink Data, Field Feedback 2023–2026
But you first need to be able to detect these problems before they get worse. That’s why having a monitoring tool that gives you full visibility into your network matters. This is what Kerlink offers with Wanesy Management Cockpit: the platform provides access to a wide range of indicators on the health of your network (RSSI – Received Signal Strength Indicator, SNR – Signal-to-Noise Ratio, spreading factor, uplink/downlink message counts), triggers automatic alerts in the event of a gateway disconnection or an abnormal drop in traffic, and allows for remote reboots, updates, or diagnostics, all without having to send a team on site.
Best practices for optimising LoRaWAN coverage
Several installation parameters should be checked and optimised to avoid a good share of the coverage issues seen in the field.
1. Installation height
This directly determines a gateway’s range: at an equivalent received signal level, coverage distance doubles when going from 15 to 50 meters in height, and triples at 100 meters.
Site selection follows different rules depending on the terrain:
- In urban areas: favor the roof of the tallest available building
- In rural areas: aim for the highest point in the area (tower, silo, water tower)
- In wooded areas: position the gateway above the canopy.
2. Radio Noise
Radio noise varies significantly depending on the environment and degrades the PDR regardless of gateway placement. A deployment that doesn’t account for this factor will underestimate the number of sites needed in outdoor or indoor environments. An unusually low PDR isn’t always a sign of poor placement, it can also be a sign of a noisier-than-expected radio environment.
3. Co-location with other radio transmitters
The best elevated sites (rooftops, masts, high points) are often already occupied by cellular or TV broadcast antennas. This proximity can desensitize the LoRaWAN gateway through out-of-band blocking, intermodulation, or spurious noise, which is exactly where the RF filters mentioned above become useful.
4. Link losses between the gateway and the antenna
Lightning surge protection, cavity filters, coaxial cable… All these components, sitting between the gateway and the antenna, contribute to coverage loss. The cavity filter, for example, often necessary to avoid interference with other radio transmitters installed on the same site, can on its own introduce between 0.5 and 4 dB of loss depending on the model chosen. It’s therefore essential to factor these elements in during installation. Combined with other losses, this gap deserves to be anticipated during installation design rather than discovered after the fact. We cover the proper use of RF filters in more detail in this dedicated article.
These best practices already significantly reduce the risk of under-coverage. But for larger-scale projects, where the financial stakes of the number of gateways to install become substantial, a radio planning study proves particularly useful.
The principle of radio planning: study first, save later
Radio planning involves modeling a network’s radio propagation before installing it, rather than discovering it once the equipment is in place.
This is the approach taken by our partner Siradel, which combines:
- a 3D SaaS radio planning tool,
- 3D geospatial data covering the entire world,
- radio planning studies carried out by neutral experts.
How does a radio planning study work?
- Collection of terrain data available for the area to be covered
- Configuration of the LoRaWAN parameters specific to the project (frequency band, target spreading factors…)
- Coverage simulation for both uplink and downlink
- Optimisation of the number and placement of gateways, to meet the coverage target with the minimum number of sites required
- Export of the coverage report
This gives you a deployment plan with the minimum viable number of gateways, complete with a predicted PDR for each zone and precise installation site definitions.
Is a radio planning study worth the investment?
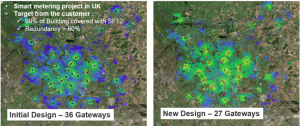
The ROI calculation is straightforward and verifiable. Take a real-world example: a smart metering project in the UK. The initial design, based on an empirical approach, called for 36 gateways. A radio planning study led to an optimised design of 27 gateways, 9 fewer.
A radio planning study typically costs around €15,000, the equivalent of 2 to 3 gateway installations. With an installation cost of €3,000 to €8,000 per site, saving 9 gateways represents a gross saving of €27,000 to €72,000. Once the cost of the study is deducted, the net gain falls between €12,000 and €57,000.
A radio planning study becomes worthwhile past a certain scale: roughly 15 to 20 gateways for an outdoor deployment. Below that, the installation best practices outlined above are generally enough to secure coverage.
© Siradel
Going further
- Watch the replay of our webinar with Siradel: https://youtu.be/Uub3rCRLt44
- Download our technical brief on antenna selection, written jointly with Siradel: “LoRaWAN Gateway Antenna Selection: Why 6 dBi is the right choice” [Free Download]